Blogger allows you to use your own custom domain instead of the default blogspot.com address. For example, instead of using yourwebsite.blogspot.com, you can connect a domain such as www.example.com.
To connect a custom domain to Blogger, you need to configure a few DNS records. This includes Google's A records, the www CNAME record, and a unique verification CNAME provided by Blogger.
In this guide, we will go through the complete Blogger custom domain setup step by step.
Step 1: Add Your Custom Domain in Blogger
First, log in to your Blogger account and select the blog where you want to use your custom domain.
Go to:
Settings > Publishing > Custom domain
Enter your domain using the www version:
www.example.comClick Save.
If this is the first time you are connecting the domain, Blogger will usually show an error because the domain has not been verified yet.
Blogger will also provide a unique verification CNAME that looks similar to this:
Name: xxxxxxxxxxxx
Destination: gv-xxxxxxxxxxxx.dv.googlehosted.com
Keep these values open because you will need to add them to your domain's DNS Manager.
Step 2: Add the Required Blogger A Records
Now log in to the control panel where your domain's DNS is managed and open the DNS Manager or DNS Zone Editor.
Add the following four A records to your root domain.
| Type | Host / Name | Points To / IP Address |
|---|---|---|
| A | @ | 216.239.32.21 |
| A | @ | 216.239.34.21 |
| A | @ | 216.239.36.21 |
| A | @ | 216.239.38.21 |
The @ symbol normally represents your root domain, such as:
example.com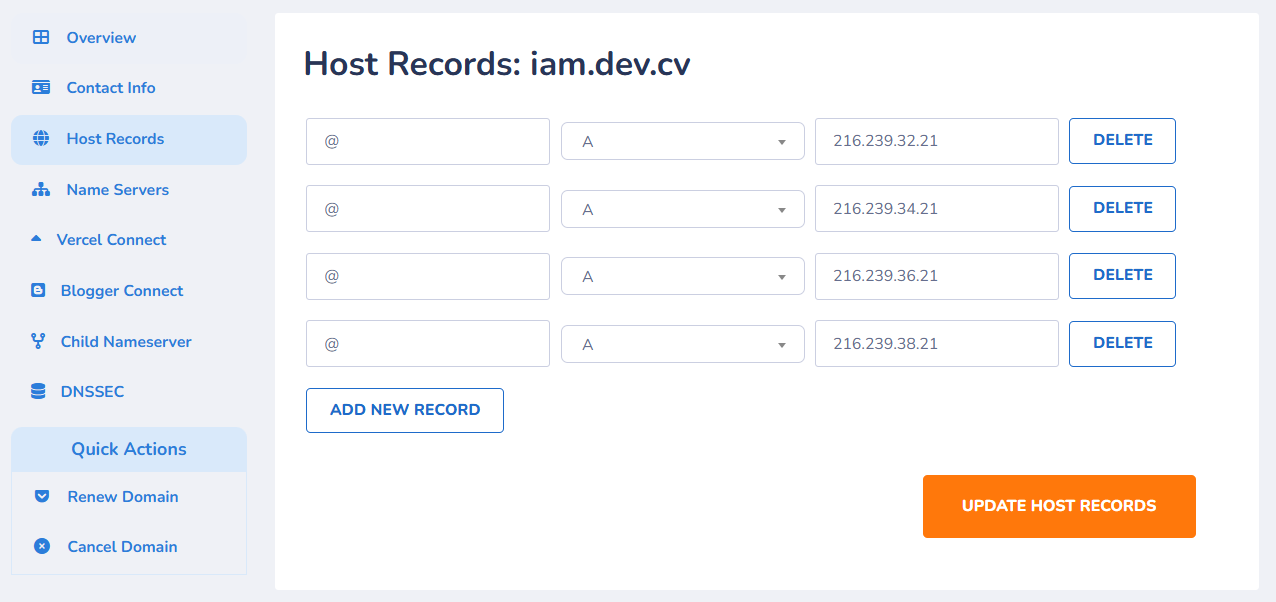
These A records are used so the root domain can work properly with Blogger, especially when you enable the redirect from example.com to www.example.com.
Important: If your domain already has A records pointing to another hosting server or website, check them carefully before removing or replacing them. Changing existing A records may affect your current website.
Step 3: Add the www CNAME Record
To make your Blogger website accessible through the www version of your domain, add the following CNAME record:
| Type | Host / Name | Destination |
|---|---|---|
| CNAME | www | ghs.google.com |
Depending on your DNS provider, the destination field may also be called Target, Value, or Points To.
In most DNS management panels, you only need to enter www in the Host or Name field.
Step 4: Add the Blogger Verification CNAME
Blogger will provide another CNAME record that is unique to your domain. This record is required to verify that you control the domain.
It may look similar to this:
| Type | Host / Name | Destination |
|---|---|---|
| CNAME | xxxxxxxxxxxx |
gv-xxxxxxxxxxxx.dv.googlehosted.com |
The values above are only examples. Do not copy them directly.
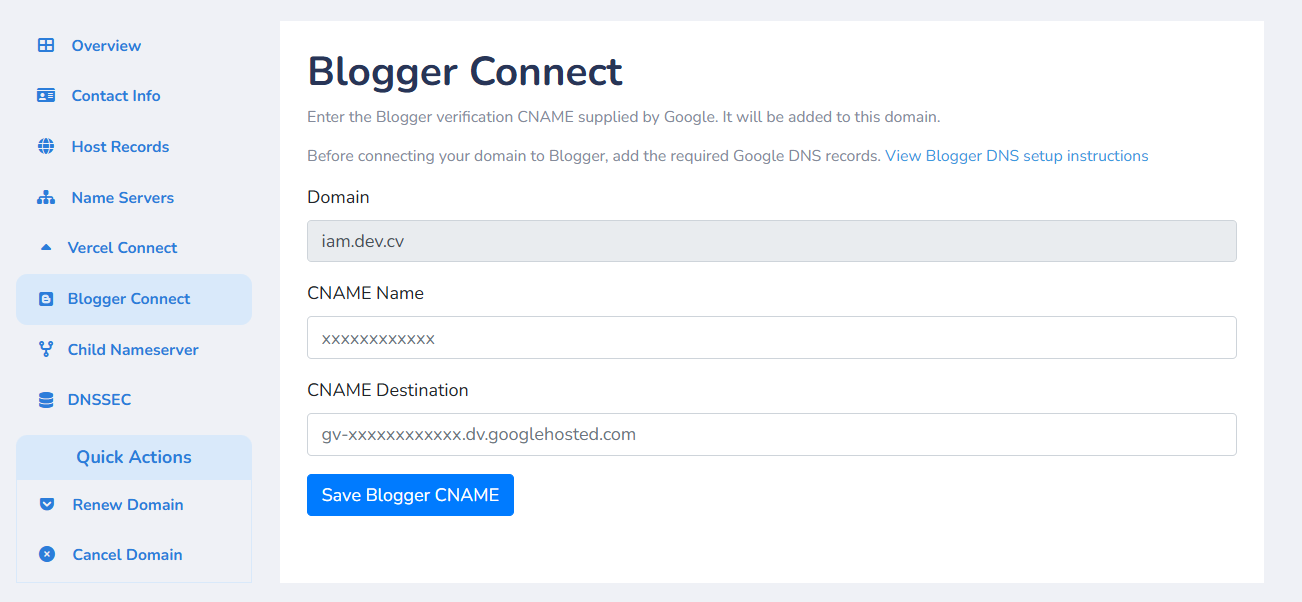
You must use the exact Name and Destination generated by Blogger for your domain.
Step 5: Check Your Complete Blogger DNS Configuration
After adding all the required records, your DNS configuration should look similar to this:
| Type | Host / Name | Value / Destination |
|---|---|---|
| A | @ | 216.239.32.21 |
| A | @ | 216.239.34.21 |
| A | @ | 216.239.36.21 |
| A | @ | 216.239.38.21 |
| CNAME | www | ghs.google.com |
| CNAME | xxxxxxxxxxxx |
gv-xxxxxxxxxxxx.dv.googlehosted.com |
Step 6: Wait for DNS Propagation
DNS changes may not become active immediately. In many cases, the records start working within a few minutes, but sometimes it can take several hours.
If Blogger still cannot verify your domain immediately after adding the DNS records, wait for some time and try again.
Step 7: Add the Custom Domain to Blogger Again
Once the DNS records have propagated, return to:
Blogger > Settings > Publishing > Custom domain
Enter your domain again:
www.example.comClick Save.
If the DNS records are correct, Blogger should now verify the domain successfully.
Step 8: Redirect the Root Domain to www
Your Blogger website will normally use the www version as the primary address.
For example:
https://www.example.comHowever, visitors may also enter:
https://example.comTo make sure both versions work properly, enable the domain redirect option from Blogger Settings.
This will redirect:
example.comto:
www.example.comStep 9: Enable HTTPS in Blogger
After your custom domain starts working, you should enable HTTPS for better security.
Go to the HTTPS section inside Blogger Settings.
First, enable:
HTTPS Availability
Blogger may need some time to generate an SSL certificate for your custom domain.
Once the certificate is ready, enable:
HTTPS Redirect
After this is enabled, visitors using:
http://www.example.comwill automatically be redirected to:
https://www.example.comCommon Blogger Custom Domain Problems
Blogger Cannot Verify the Domain
If Blogger says that it cannot verify your domain, check the verification CNAME carefully.
- Make sure the CNAME Name is correct.
- Make sure the Destination is correct.
- Confirm that the record type is CNAME.
- Check for typing mistakes or extra spaces.
- Wait for DNS propagation before trying again.
www Domain Is Not Working
Make sure you have added the following CNAME:
www → ghs.google.comAlso confirm that the custom domain added inside Blogger is:
www.example.comRoot Domain Is Not Working
If example.com is not working, check that all four Google A records have been added correctly.
216.239.32.21216.239.34.21216.239.36.21216.239.38.21
You should also enable the root domain redirect option inside Blogger.
HTTPS Is Not Available
Blogger may need some time to issue an SSL certificate after your custom domain is connected.
Make sure your DNS records are correct and wait until HTTPS Availability becomes active.
Supported SPL Extensions for Blogger Connect
The CORNQ Blogger Connect method described in this guide is currently available for the following supported SPL extensions:
bro.aldev.cvinfo.mpsch.acstore.cv
and more.
If your domain uses one of these extensions, you can use the Blogger Connect option from the CORNQ Domain Details page to complete the CNAME verification process.
Frequently Asked Questions
Can I Use My Own Domain With Blogger?
Yes. Blogger supports custom domains, so you can use your own domain instead of a blogspot.com address.
Do I Need Web Hosting for Blogger?
No. Blogger hosts your website. You only need a domain name and access to the domain's DNS management panel.
What Is the CNAME Record for Blogger?
The standard CNAME record for the www hostname is:
www → ghs.google.comBlogger will also provide another unique CNAME that is used to verify ownership of your domain.
What Are the Blogger A Records?
Blogger commonly uses the following four A records:
| Record | IP Address |
|---|---|
| A Record 1 | 216.239.32.21 |
| A Record 2 | 216.239.34.21 |
| A Record 3 | 216.239.36.21 |
| A Record 4 | 216.239.38.21 |
Why Does Blogger Give Me a Verification CNAME?
The verification CNAME confirms that you have control over the domain you are trying to connect. The value is unique, so you should always use the record provided directly by Blogger.
How Long Does Blogger DNS Verification Take?
It may work within a few minutes, but DNS propagation can sometimes take several hours. The exact time depends on your DNS provider and existing DNS settings.
Conclusion
Connecting a custom domain to Blogger is mainly a DNS configuration process. You need to add Google's four A records, point www to ghs.google.com, and add the unique verification CNAME generated by Blogger.
After the DNS records become active, add the domain again inside Blogger, enable the root domain redirect, and turn on HTTPS.
Once everything is configured correctly, your Blogger website will be accessible through your own custom domain.