If you have deployed a website or application on Vercel, you can connect your own custom domain instead of using the default vercel.app address.
For supported CORNQ SPL domains, the process is simple. You first point your root domain to Vercel using an A record. After that, add the domain to your Vercel project and complete the TXT record verification through the Vercel Connect option available in CORNQ.
This guide explains the complete Vercel custom domain setup step by step.
Step 1: Point Your Domain to Vercel
First, log in to the DNS management panel for your domain.
Add the following A record:
| Type | Host / Name | Value / IP Address |
|---|---|---|
| A | @ |
76.76.21.21 |
The @ hostname represents your root domain.
For example, if your domain is:
example.dev.cvthe A record will point example.dev.cv to Vercel's IP address:
76.76.21.21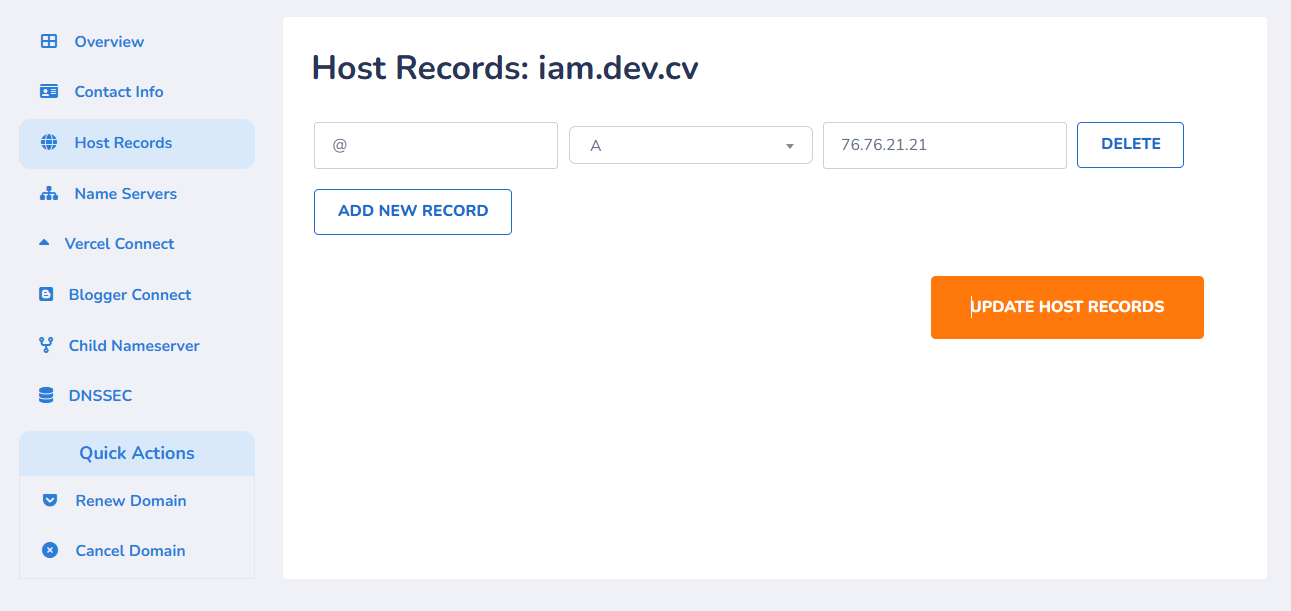
After saving the DNS record, wait around 15 minutes before continuing. DNS propagation time can vary, so the record may become active sooner or may occasionally require more time.
Step 2: Add Your Custom Domain to Vercel
Once the A record has been added, log in to your Vercel account.
Go to:
Vercel Dashboard > Projects > Select Your Project
Open the domain section and choose the option to Add or Connect an External Domain.
Enter your domain name without www.
For example:
example.dev.cvThen click Add.
Step 3: Get the Vercel TXT Verification Record
After adding the domain, Vercel will check your domain configuration.
For supported domains that require additional ownership verification, Vercel will provide a TXT verification record.
Copy the TXT record exactly as it appears in your Vercel dashboard. You will need this record to complete the verification from CORNQ.
Step 4: Verify Your Vercel Domain Through CORNQ
Now log in to your CORNQ account.
Go to:
Domain Section > Select Your Domain > Domain Details > Vercel Connect
You will find the Vercel Connect option on the Domain Details page for supported SPL extensions.
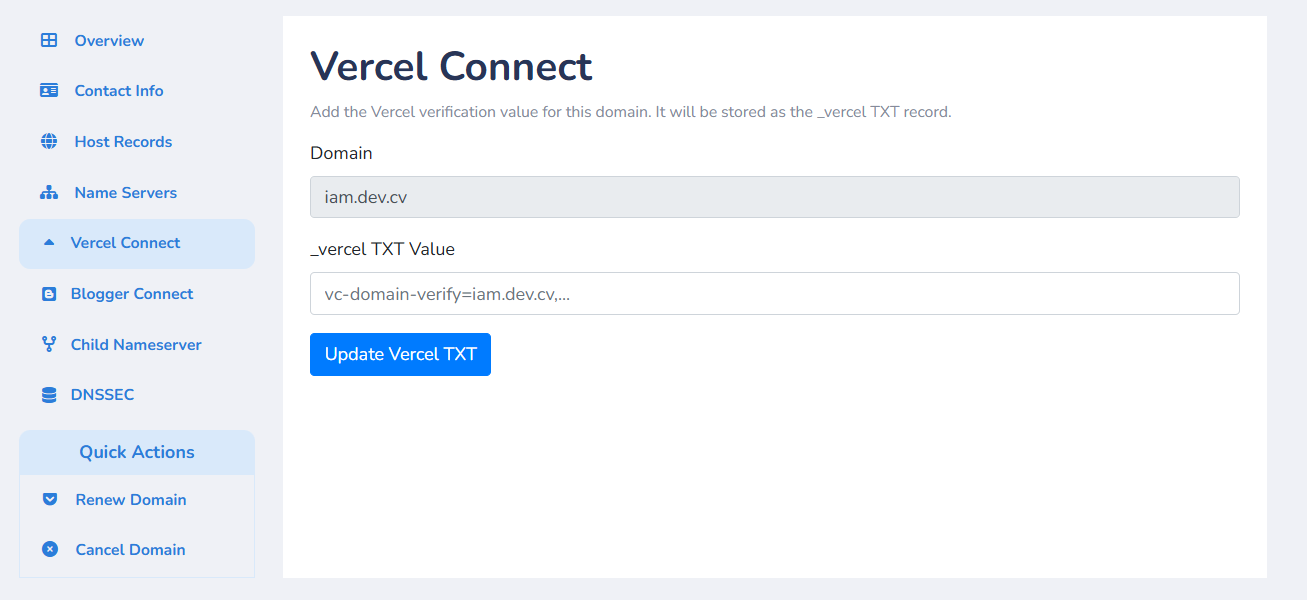
Paste the TXT verification record provided by Vercel into the required field and click on Update Vercel TXT.
Make sure the TXT record is copied correctly. An incorrect verification value may prevent Vercel from verifying your domain.
Step 5: Wait for Vercel Domain Verification
After submitting the TXT record through CORNQ, wait around 10 to 20 minutes.
Vercel should automatically detect the verification record after the DNS changes become available.
You can then return to your Vercel project and check the domain status.
Once the domain has been verified successfully, your Vercel project should become accessible through your custom domain.
For example:
https://example.dev.cvComplete Vercel Custom Domain Setup
The complete setup process can be summarized as follows:
- Open your domain's DNS management panel.
- Add an A record for
@pointing to76.76.21.21. - Wait around 15 minutes for the DNS record to become active.
- Log in to Vercel and open your project.
- Add your domain without
www. - Copy the TXT verification record provided by Vercel.
- Log in to your CORNQ account.
- Open the Domain Details page.
- Go to Vercel Connect.
- Enter the Vercel TXT record and submit it.
- Wait around 10 to 20 minutes for verification.
- Access your Vercel project using your custom domain.
Supported SPL Extensions for Vercel Connect
The CORNQ Vercel Connect method described in this guide is currently available for the following supported SPL extensions:
bro.aldev.cvinfo.mpsch.acstore.cv
If your domain uses one of these extensions, you can use the Vercel Connect option from the CORNQ Domain Details page to complete the TXT verification process.
Vercel DNS Record for a Custom Domain
For this setup, the main DNS record you need before adding the domain to Vercel is:
| Record Type | Name | Value | Purpose |
|---|---|---|---|
| A | @ |
76.76.21.21 |
Points the root domain to Vercel |
Vercel will provide the additional TXT record required for domain verification after you add the external domain to your project.
Common Vercel Custom Domain Problems
Vercel Says the Domain Has an Invalid Configuration
First, confirm that your root domain has the correct A record:
@ A 76.76.21.21If you recently added or changed the record, allow some time for DNS propagation before checking again.
Vercel Cannot Verify the Domain
Make sure you copied the TXT verification record exactly as provided by Vercel and submitted it through the CORNQ Vercel Connect option.
After submitting the verification record, wait around 10 to 20 minutes and check the domain again.
The Domain Still Opens the Previous Website
If your domain previously pointed to another hosting server, an old A record may still be active or cached.
Check your DNS configuration and make sure the root domain points to:
76.76.21.21Frequently Asked Questions
How Do I Connect a Custom Domain to Vercel?
Point the root domain to 76.76.21.21, add the domain to your Vercel project, and complete any domain verification requested by Vercel. For supported CORNQ SPL domains, the TXT verification record can be submitted through the Vercel Connect option.
What Is the Vercel A Record IP Address?
For the setup described in this guide, use the following A record:
@ A 76.76.21.21Should I Add the Domain With www in Vercel?
For this CORNQ Vercel Connect method, add the root domain without www.
For example:
example.dev.cvHow Long Does Vercel Domain Verification Take?
After submitting the TXT verification record through CORNQ, it normally takes around 10 to 20 minutes for the change to become available. DNS propagation can occasionally require additional time.
Where Can I Find Vercel Connect in CORNQ?
Log in to CORNQ, open the Domain Section, select your domain, and open its Domain Details page. If the extension is supported, you will find the Vercel Connect option there.
Conclusion
Connecting a supported CORNQ domain to Vercel requires only a few steps. Point the root domain to 76.76.21.21, add the domain to your Vercel project, copy the TXT verification record, and submit it through CORNQ Vercel Connect.
After DNS propagation and verification are complete, your Vercel project will be accessible through your custom domain.